
Step 1. Wolf Sheep Predation model
1. Download the NetLogo software
To build your own Game of Thrones ABM, you first need to download the NetLogo software (Wilenski), which is used by scientists all over the world.
Download the appropriate version here: https://ccl.northwestern.edu/netlogo/download.shtml
The NetLogo software was originally designed to be used by children, so its language is pretty easy to learn. However, it is still flexible and strong enough to accommodate legit scientific models.
While you are on the NetLogo website, make sure to check out the three tutorials available in the Web User Manual. Going through those will give you a head start for the rest.

2. Open the Wolf Sheep Predation model
Open the NetLogo app (not 3D or Logging, just Netlogo.app).
When you first open NetLogo, you get a blank model with an empty Interface. If you click on the Code tab at the top of the window, you can see that the coding section is empty. For now...
One of the good things with NetLogo is that it comes with great models that you can access and modify at will. To access those:
File -> Models Library
You should spend some time exploring the models here. They are a great resource when trying to find ways to code something specific.
For the present tutorial, type "Wolf" in the Search bar. This will point out the location of all models dealing with wolves.
Click on the 'Wolf Sheep Predation' model, and select 'Open'.
3. Explore the model
The Wolf Sheep Predation model allows a user to explore predator-prey dynamics.
To get more detail on how the model works, and how Interface variables affect the dynamics of the model, you can click on the 'Info' tab. This section has a summary of what the model does.
On a side note, the Info tab should always be updated to reflect what a model does. This helps other users understand and use models.
When you first open a model, the World window is black. Click on the button 'setup' to see the wolves and sheep on the landscape.
To see the code behind the model, click on the 'Code' tab. You will see that NetLogo's code is colorful. We briefly explain those colors below.
At first, try to read the code and see if you can figure out what it does. Don't focus too much on the details, just try to get the big picture.


4. Model Interface
The Interface of NetLogo ABMs usually have several buttons, sliders, and windows, as we have here. To avoid getting overwhelmed, focus on the colors.
Blue-green boxes show variables that can be changed by the user. Those can be dropdown menus, sliders, input boxes, or switches (ON-OFF).
Purple boxes are buttons that perform an action. The action is called in the button itself (right-click on setup, and select "Edit" to see what that looks like. You can see the line "setup" in the Commands box. This call the "setup" function in the main code.
Notice that the "go" button has an arrow sign that the "setup" button doesn't. This sign means that, when clicking the "go" button, it will remain clicked (and will call the "go" function) until you click it again.
Beige boxes show outputs from the model. Those can be graphs or values.
Click "go" and see how the model behaves.
Then, change some of the variables you can (blue-green boxes).
Click "setup" and "go" again to see how the changes you made affect the simulation.
4. Basic NetLogo code info
NetLogo uses the Logo coding language. As any other language, it has some terms that do specific actions under the hood. Those are called "primitives" and have different colors. The following is a simplification:
-
Green: Setup and function terms
-
Blue: Action verbs
-
Orange: Numbers and colors
-
Purple: Names, objects, or qualifiers
NetLogo code always starts with some setup lines (see image).
Here, the first line creates a new variable called "max-sheep" that is a global variable. This means that it can be called or changed by any entity of the model.
Then, the code establishes the entities of the model.
NetLogo has 3 types of entities: Turtles, links, and patches. Please refer to the NetLogo tutorial to know more about those.
Here, the model has two breeds of turtles: wolves and sheep. Both of these breeds have the variable "energy" (in the turtles-own section) which gets depleted by movement, and gets replenished by food.
Patches have the variable "countdown." This countdown is used to replenish eaten grass in the "sheep-wolves-grass" model-version (see the top dropdown menu in the Interface).

5. NetLogo Procedures
After setting up the entities in the model, NetLogo code usually has a "setup" procedure.
A procedure is a function that gets called somewhere and that produces a certain action. In NetLogo, a procedure is created using
to ProcedureName
end
Anything that is between the 'to' and 'end' lines is done when the procedure is called.
Here, notice that the first procedure is called 'setup' and the second is called 'go'.
When you press the setup button on the Interface, it calls the 'setup procedure and runs all lines of code within it. Similarly, when you click the 'go' button, it calls the 'go' procedure.
Notice that 'setup' is usually called only once, to "set up" the simulation, and 'go' is what makes the model change.
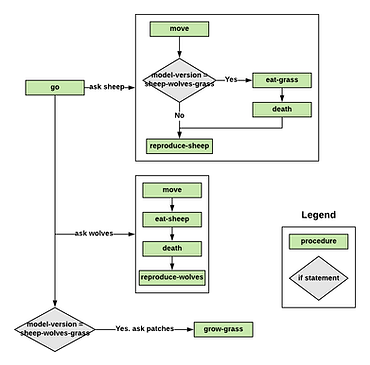
Read through the code to identify all procedure and try to see how and when they get called. You can use the flowchart to help.
6. Save the model
While there are a lot of things we can do while exploring the Wolf Sheep Predation model, we need to start working on transforming it into the Game of Thrones world.
As you will transform this model to make your own, save a copy of this model on your computer (File -> Save as). This will be the base of your GoT ABM.
Good job exploring a NetLogo model! Next, let's add humans.